Stratasys Direct now offers Stratasys J750 Digital Anatomy printing through their Eden Prairie, Minn. manufacturing facility. To get started simply contact an engineer at Stratasys Direct Manufacturing and mention that you are looking for Stratasys J750 Digital Anatomy parts – once your request is submitted you’ll be connected with a team dedicated to Healthcare at Stratasys. The experts will review your request and let you know the best path forward, whether it is with the Stratasys J750 Digital Anatomy Printer or not. We also offer Healthcare design services to ensure your success with your print job – even if you don’t have a file to start with.
The Stratasys J750 Digital Anatomy Printers run on six model materials and one support material:
The combination of these materials allows us to replicate just about any anatomy requests using virtually any geometry provided. The secret sauce to our materials really lies within our “Matrix” materials: Bone, Gel and Tissue. The unique properties of these materials allow us to combine them to create an extremely soft tissue or an extremely tough bone model. You can get the full details on these materials in our Advanced Medical Models Technical Application Guide. You’ll notice we do not provide data sheets on these three materials, so what are their properties? Well, we cannot describe our material properties without explaining how the software to deposit these materials works.
The most innovative aspect of the Stratasys J750 Digital Anatomy Printer is the way we handle material deposition.
3D printing is unique in that we can print whatever is conceivable in design software, however, design software is often not setup to model the complexities of the human body. If we were to design patient-specific anatomy and print it to be functional, we would very quickly run into a brick wall in the time and cost it takes to model individual structures of human anatomy. With implicit design, we can take a standard 3D model and apply a standard set of algorithms to generate a complex interior surface. When we apply the principle of implicit design to the voxel-based Stratasys J750 Digital Anatomy Printer, the output is functionally accurate anatomy as opposed to a light-weighted or optimised part.
With this method all we need to successfully print a functional anatomical model is a simple old-school STL file. For this blog post, we’ll use a sample Femur model uploaded to the Thingiverse Community by katanakazi https://www.thingiverse.com/thing:4004365. To understand how we jet our materials on the build tray for this model, we first need to look at the anatomy:
If you review the structure of the femur bone, you’ll see that near the centre of the bone there is a hard exterior with a soft, marrow interior but as you look at the proximal end the bone changes to a spongy trabecular bone structure. So how do we assign materials in software to represent this complex bone structure using a single 3D file?
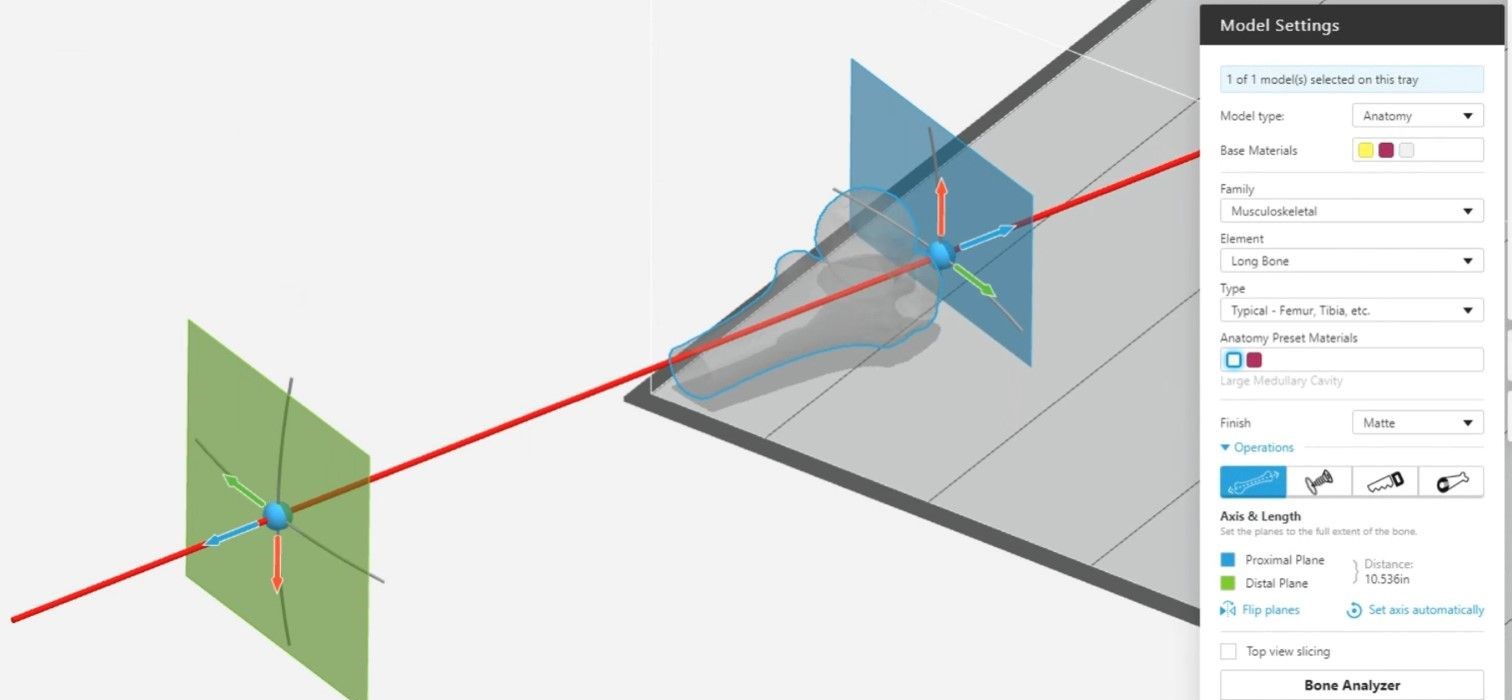
In the screenshot below we have assigned a material family of “Musculoskeletal”, an element of “Long Bone” and a type of “Typical – Femur, Tibia, etc.” in GrabCAD Print which will allow us to modify additional bone parameters. The axis for the bone has already been modified as if it were a whole femur bone instead of just a small proximal section.
The blue represents the proximal end, and the green represents the distal end of the bone, we have extended the distal end off the build platform so that the software correctly generates areas where bone marrow should exist and properly transitions from bone marrow to the trabecular structure closer to the end. Using the Bone Preview tool in GrabCAD Print, we can see how the materials are being deposited and show the differences between properly setting the axis and improperly setting the axis. On the left, we can see the correct example where the “Top Slice View” shows a proper transition and on the right, we see the incorrect example where it tries to fit both the proximal and distal ends into this single model.
If we look close enough, we can see multiple different colours represented in the “Top Slice View”, in this case we see a thin blue outline, a thicker white outline followed by mixtures of white and yellow as we move into the bone. The software is looking at the settings we applied in GrabCAD and using mathematical functions to determine how to deposit different materials, each colour representing a different material. This is what we mentioned as implicit design earlier in the blog – we’re looking at a textbook example of what an anatomical structure should look like and applying it to the Stratasys J750 Digital Anatomy Printer using implicit design.
With implicit design, material properties depend on the geometry of the printed model, meaning we cannot publish material properties of individual materials. Instead, many existing Stratasys J750 Digital Anatomy users have started to generate publications and white papers for peer review on how these structures compare to native tissue. If you’re interested in reviewing publications where Stratasys 3D Printers are used, please reach out to the Stratasys Healthcare team by visiting Stratasys.com/medical.
Note: For this demonstration, we assigned material properties in GrabCAD Print, which is a free print preparation software for Stratasys printers. Visit grabcad.com to download it today.
The Stratasys team is ready to support the healthcare additive manufacturing community! We pride ourselves on choosing the correct 3D Printing technology for the application. While we have a wide breadth of hardware solutions including PolyJet, FDM, RPS, P3 and SAF, we also have multiple facilities dedicated to part production using both conventional and additive manufacturing through Stratasys Direct Manufacturing.
And while you’re at it, we encourage you to join industry groups who are working to advance the use of 3D printing at the Point-of-Care and within Medical Device Manufacturers:
ASME Medical Advisory Committee
ASTM Committee F42 on Additive Manufacturing Technologies


